Call of Duty: Black Ops Multiplayer Maps Guide
Tired of going 2-28? Can't figure out where you are and where your enemy keeps coming from? Use the guide below to figure out exactly what should be done on each map to get the most out of your game!
This will be updated daily, with overhead maps coming very, very soon. We are also going to add preferred loadouts, equipment tips, secret areas, and other essentials. In the mean time, please leave comments and help the community out!
Array
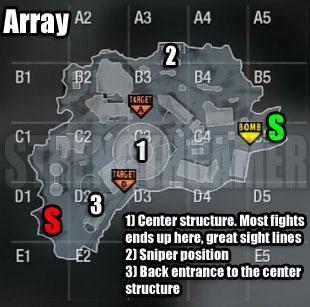
Map Size: Large
The majority of this map's fighting occurs around the communication array (the giant circular building in the middle of the level). If you and your team can take this section over, you'll have sight lines to nearly the entire map, along with control over the entrances and exits to it. Just be careful of the windows. They aren't enough cover to be comfortable with, and any decent player is going to be able to get you if you aren't careful.
Keep in mind that a well thrown grenade (especially Nova 6 gas) can shake the interior defense up enough to surge. Along with that, if you plan on traveling across the map, stay away from the center areas. Stick to the outer ring and use the appropriate cover.
My general strategy for this map is to stay away from the middle section, and pick enemies off from the distance. Use medium to long range class set ups, as there are a lot of long sections with great sight lines. This map can easily be a sniper's paradise.
Cracked
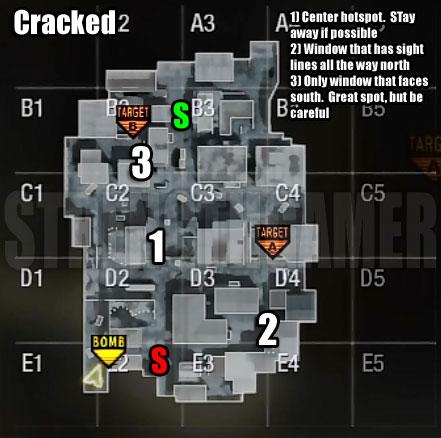
Map Size: Medium
This map is all about being on the move. There are a ton of buildings, and a few wide open streets. While the map is medium size, it feels very small and confined, so use short to medium range weapons if you want the best outcome.
Spawn points are on the northern and southern sides of the map, so being able to get behind them is key to success. If you stick to the outer edges of the map, getting the jump on your opponent is easier than it seems.
While staying inside and using a window for sight lines may seem like a good idea, this map makes it really easy for a grenade to be lobbed in. Look for an enemy, fire, and move. That's the best way to survive this map.
Crisis
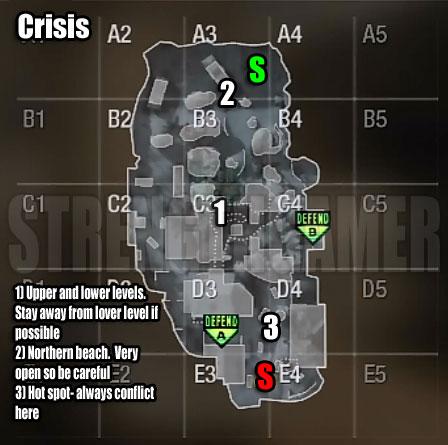
Map Size: Large
I highly suggest using mid to long range weapons on this map, especially considering how open the map can become.
Towards the northern side of this map is an open beach area where a lot of fighting can occur. Watch your radar for this to happen, and use the cover in A2 to get a good sight line on this area. In the middle of the map is an underground bunker where you can travel from the northern to southern ends without being in direct fire. Be careful in here though as this can become a very highly trafficked area at times.
There are some really nicely laid out building to the south that offer a lot of good cover. If you are a shotgun expert, lure your enemies into these buildings. This map can easily support all walks of life, so stick to what you're best at.
Firing Range
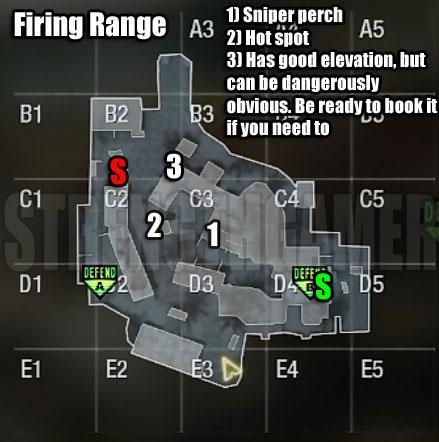
Map Size: Small
This map is all about great cover spots and small fighting areas. Unlike most small maps where the fighting tends to concentrate around one area, this map is all over the place. Pay attention to your radar to find the best spots.
I highly suggest finding a buddy to play with on this map. Having someone to watch your back on this map is critical due to all the buildings and the ease of being flanked. There is a sniper perch in C3 that can easily be accessed via ladder, and easily destroyed via grenade. Watch out for this.
The area that I have noticed that has the most fighting tends to be right around B2 and C2. It's an open area that has a lot of exits aimed at it. If you want the best overhead look aside from the sniper post, head to B2/B3 and hop on top of this building. Lay down a C4 to cover your rear and you'll be picking people off in no time.
Grid
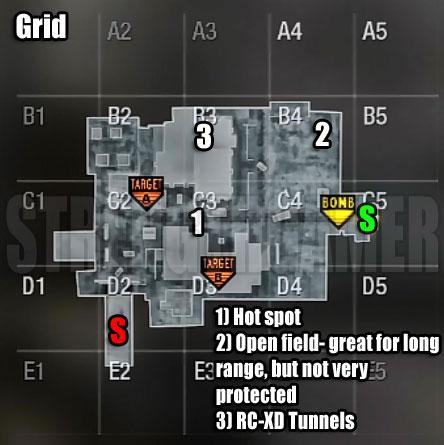
Map Size: Small
This map is set up with two large buildings facing each other. There's some room to the edges where you can run around and play, but the majority of the right ends up in the middle.
What this essentially means is that you can take it inside the buildings and play close up with SMG's and Shotties, or you can stay outside with your Sniping skills and pick enemies off one by one. Just be aware that there's not a whole lot of cover to the outside.
This map has some RC-XD tunnels that you should use often. The tunnels go through the northern buildings, and also through the southern building's lower level. This is a great way to use your RC-XD without having an enemy blow it up.
I found it safest to stay inside, using the stairs to the second floor to find cover when necessary.
Hanoi

Map Size: Large
This map is super simple. There are two large center courtyards, surrounded by a perimeter of slim buildings. If you want to travel to the other side of the map, stick to the edges as the center area tends to get the most action.
This is one of those maps where the fighting isn't routine at all. While the center area does tend to get the most action, the fight travels all over the map, leaving you open at all times. Pay attention to your radar, and also stay close to your team.
My best advice is to just hug the outer walls when trying to travel, stay out of the center unless you are ready to fight, and if you are on a team that actually plays like a team, try to take over the two buildings to the east and southwest of the prison ring.
Havana
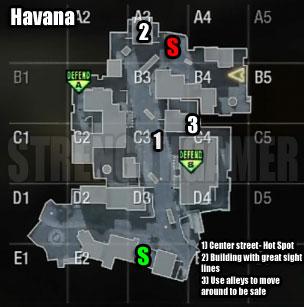
Map Size: Medium
This map consists of one key thing: an "S"-shaped street. Keep this in mind as you play it, because it's going to be crucial to your success.
The main route is north to south on this map, with tons of buildings, cars, and alley's to provide both protection and excellent flanking positions. If you are a decent Sniper, you can set up shop at either curve of the "S" and have a great sight line to the other end of the road.
Can't stress enough how incredibly terrible of an idea it is to run down the central street. There are far too many locations where the street is completely visible for this to ever be a good idea.
From what I can tell, the majority of the time while playing this map you and your team are going to be only able to take over one side of the road. No matter how hard you try to establish position even midway up the road, you almost always end up back where you started. My advice, stay at your end of the road and hunker down. Grab someone on your team that has some sweet Sniping skills and give him cover fire. Use the edges to advance, but only to a certain point. There's no point in trying to advance all the way to the other end of the road, as there's just too many openings to ever be truly successful.
Jungle
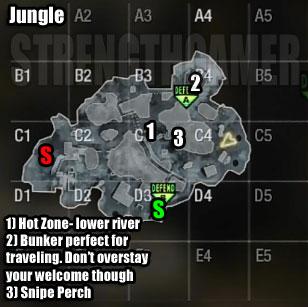
Map Size: Small
In the middle of the map there is a river. Stay out of it. It's danger. There are so many spots where this river is visible from, it's actually a bit ridiculous. If you want to stay in an area that has great cover, head over to C1, C2, D2-ish area. There are a bunch of ruins here that provide excellent cover.
All in all this map is fairly simple. On one end you have the ruins, and the other you have the jungle. Be careful of a sniper spot at the northern corner of C3 (next to C4) as this can dominate you. It is easy to get to by going around however, so not a whole lot of worry there.
This map is not a good map for campers. Every area has multiple routes in and out, and it's so small that there's a lot of traffic constantly moving in every area. I suggest sticking to close to mid range weapons, but keep in mind there are a few areas where sniping can be legit (C1 for instance).
Launch
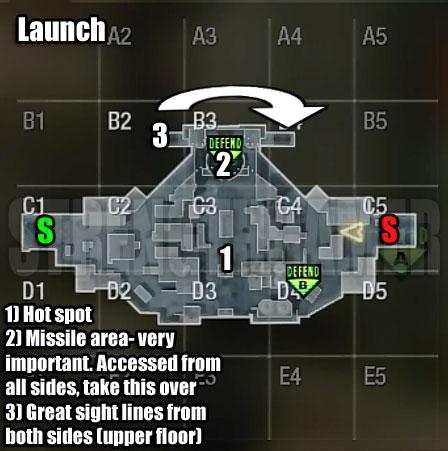
Map Size: Large
The heaviest trafficked area here is located in the center at C3 (just north of D3). I found out really quick that trying to fight on the raised middle area is a bad idea.
There's a giant missile (B3) in this level (hence the name Launch) that needs to be addressed. From either side of the top of this missile is a platform that oversees the entire edge of said side. Get in position here and you'll pick a lot of people off. Along with that, there's a small raised platform inside of this missile that a few people tend to get on. You won't see them as you enter the base of this missile so make sure to always look up there in case they are trying to hide. This missile is key to your success, and taking this over with your team will almost always lead to victory.
Medium range weapons (like Assault Rifles) are easily the most advantageous choice in this map, considering how the line of sight is almost always blocked. Short range weapons are nice if you are up above the missile on the walkway, but they just seem to be a little out of range all the time.
Safest spot to be is definitely in the missile area itself. Stay away from the center if you can. If the fight brings you there, stick to the buildings on the outsides of D3 for cover.
Nuketown

Map Size: Small
This map blows. Plain and simple. Feels like the smallest map in the game, and it's absolutely chaos the entire time. If you are one of those random grenade thrower-types, you'll love this map. Best advice here is to stay out of the houses for extended periods of time. I know it's tempting, but trust me it's a bad idea.
The main problem with this map is the spawn points are constantly flip-flopping. If you spawn and hang out in the backyard, the enemy will spawn near you. Be on the look out for this.
Stick with short to medium range weapons, stay away from the houses, don't go into the middle, and find some nice sight lines via the garage or the white picket fence facing the back of the house.
There is however a really cool secret path you can take with a RC-XD. You can drive it through either fence in the backyard to end up on the other side of the map. You'll have to use your nitro at one point (at least I always have to, but I suck at Mario Kart so who knows) if you want to successfully use it.
I do like this level for one reason though: Double Rainbow All The Way.
Radiation
Map Size: Medium
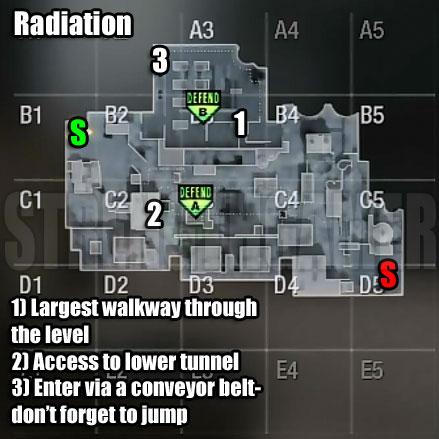
Best way to think of this map is that it's open from east to west, with a few buildings scattered around the outside. Important to note that there is a large tunnel in the center of the level, that can be opened using switches in the north and south catwalk. The tunnel is located in C3.
When it comes to the layout, it's basically the same on either side. There are two-story buildings on each side that you need to understand the layout to very well. From the second level of each of these you can have a really great line of sight at the other building across the way. Once again, be careful because windows aren't as great a cover as one may think.
If you end up at the southern end are using the catwalks to travel, don't worry too much as the small wall covers you for the most part. This is a great opportunity to reload or situate yourself for the battle ahead.
Whatever you do, do not run across the center of the map. Just stick to the outsides and you'll do fine. Also, I highly recommend mid to long range weapons, as short range once again always seem to be just out of reach.
Summit
Map Size: Medium
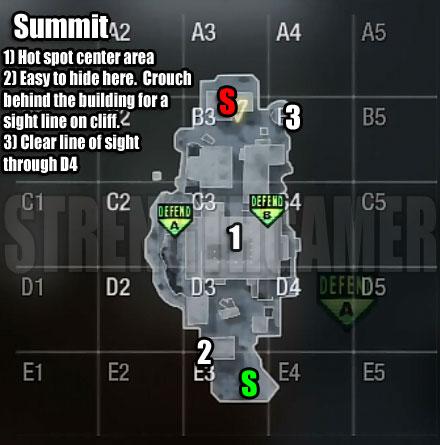
The main portion to this map is a massive building in it's center. This is where the majority of the fights are going to take place. It's impossible to not come into contact with, as you almost always have to go through it, or if not, you have to go on the outer edges of it.
There are some cliffs towards the outer edges of the map that you can opt to travel along, just be careful about the sight lines of your enemy. There are more than enough rocks and random objects to hide behind and wait for you to get into their sights. Along with that, the ledges to the east and west hardly offer any cover at all, leaving you completely prone to ownage.
I suggest user Sniper Rifles or LMG's. Stick with long range and short range, as you are either going to be face to face with your enemy (especially inside the building), or far enough away to snipe.
Villa
Map Size: Medium
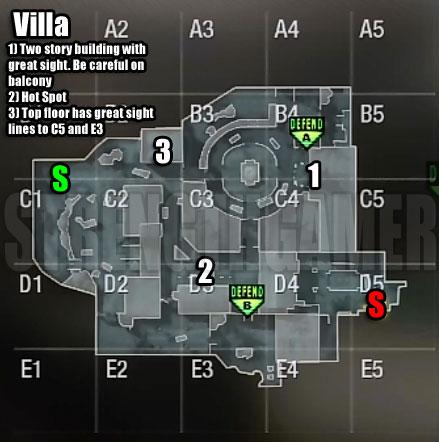
This map is incredibly open, with most of the combat happening at medium to long range. There's a nice area you can set up in B4. It's a building with two levels that has a lookout over the fountain (west), and the southern section of the map. Be on alert while you're here though as there are a few entrances to sneak up on you.
I have had a lot of success on this map staying inside and using SMG's however, so don't feel that you have to change your class to something you aren't comfortable with. Just keep in mind that if you take this route it's going to be in your best interest to stick within the walls of the many buildings.
WMD

Map Size: Large
This is probably the largest map in the game. There's a lot going on and it's really important to get acquainted with it all if you want to do consistently well here.
One of the coolest features to this map is the ability to jump from rooftop to rooftop. Use this to your advantage and get the jump on your opponents. The building in C3 has some really great roof access with a little bit of maneuvering.
There's also a really sweet sniper tower located in A4/B4 that offers a view of almost the entire map.
The biggest keys to this map are be aware of your surroundings, use the rooftops to your advantage, and stick with whatever weapon you feel most comfortable with. Because there is so much going on, any class will work fine. I will however suggest using mid to long range weapons
